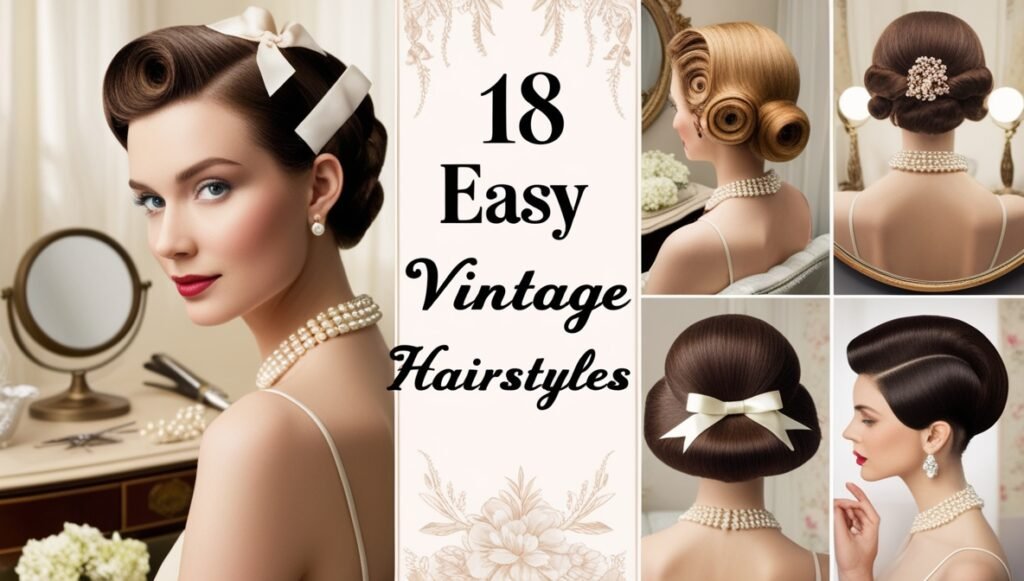
Vintage fashion and hairstyles are making a major comeback, bringing a sense of timeless charm and elegance to modern beauty routines. From glamorous waves of the 1920s to the bold victory rolls of the 1940s, vintage hairstyles have a way of blending nostalgia with sophistication. What makes these hairstyles even more appealing is how easy they are to recreate at home. With just a few basic tools like bobby pins, curling irons, and setting sprays, you can transform your look into a retro masterpiece. Whether you’re heading to a themed event, a special occasion, or simply want to elevate your everyday style, these 18 easy vintage hairstyles will have you turning heads effortlessly.
Tools You’ll Need
Before diving into these 18 easy vintage hairstyles, it’s important to gather a few basic tools that will help you achieve that perfect retro look. The good news? Most of these tools are likely already in your beauty kit!
Essential Tools for Vintage Hairstyles
- Curling Iron or Hot Rollers: Perfect for creating curls, waves, and volume for styles like Hollywood waves or pin curls.
- Bobby Pins: A must-have for securing victory rolls, Gibson tucks, and other intricate updos.
- Setting Spray or Hair Gel: Helps hold your hairstyle in place all day, especially for structured styles like finger waves.
- Fine-Tooth Comb: Great for teasing and sectioning hair to add volume or precision.
- Hairbrush: Ideal for smoothing and finishing your vintage look.
Optional Vintage Accessories
To truly capture the essence of these timeless styles, consider adding vintage-inspired accessories to your look:
- Scarves: A 1940s classic for styles like the scarf roll or casual updos.
- Hairbands: Perfect for recreating flapper-inspired looks or retro beehives.
- Brooches or Hair Clips: Add a touch of glamour to buns or side-swept styles.
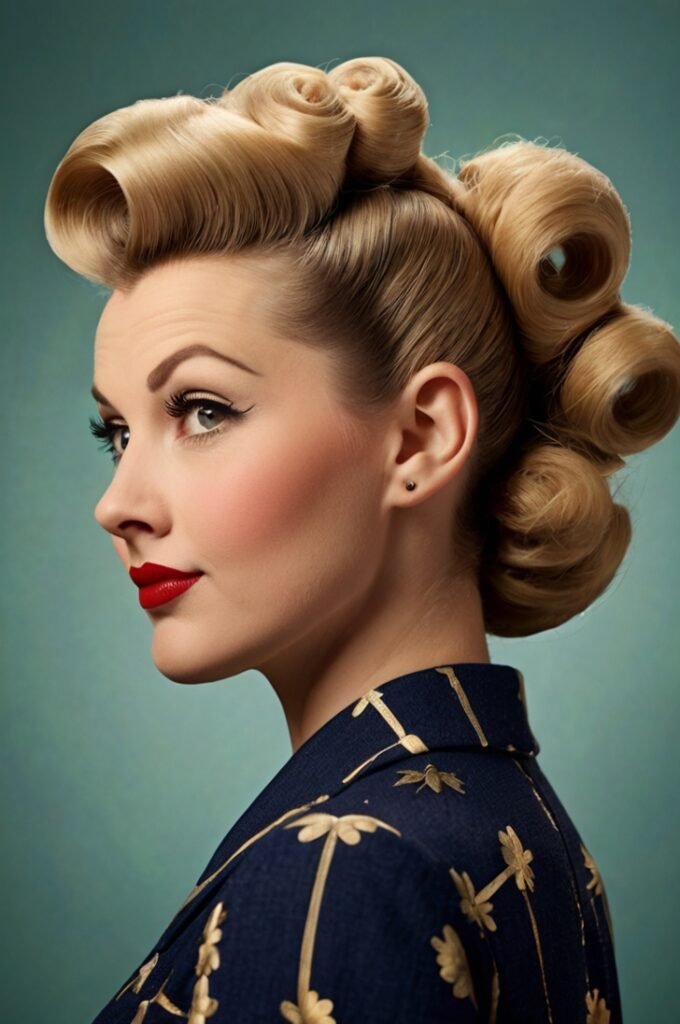
1. The Classic Victory Rolls
One of the most iconic hairstyles of the 1940s, the Victory Rolls exude vintage charm and elegance. This timeless look features rolled sections of hair at the crown, creating height and drama that instantly transports you back to the golden era of style. Whether you’re dressing up for a special occasion or adding some retro flair to your everyday look, victory rolls are surprisingly easy to recreate at home.
Tools You’ll Need
- Curling Iron: To create the soft curls needed for the rolls.
- Fine-Tooth Comb: For teasing and sectioning the hair.
- Bobby Pins: To secure the rolls in place.
- Hairspray: To hold the style and keep it looking flawless all day.
Step-by-Step Guide
- Prepare Your Hair: Start with clean, dry hair. Use a curling iron to create loose curls, focusing on the sections at the crown.
- Section the Hair: Part your hair down the middle or to the side, depending on your preference. Take one section of hair from the front and tease it slightly for volume.
- Create the Rolls: Wrap the teased section of hair around your fingers to form a loop, then roll it toward your scalp. Secure the roll in place with bobby pins. Repeat on the other side.
- Set the Look: Use hairspray to hold the rolls in place and smooth any flyaways.
- Optional Finishing Touches: Add a vintage scarf or a decorative pin to enhance the retro vibe.
2. The Retro Pin Curls
Soft, bouncy, and effortlessly glamorous, pin curls were a staple hairstyle in the 1930s and 1940s. This vintage classic is perfect for adding a touch of elegance to your look, whether you’re recreating an old Hollywood vibe or simply elevating your everyday style. The best part? You can achieve this timeless hairstyle without heat, making it a gentle yet stunning option.

Tools You’ll Need
- Bobby Pins: Essential for holding the curls in place as they set.
- Setting Lotion or Mousse: Helps the curls hold their shape and last longer.
- Fine-Tooth Comb: For precise sectioning and smoothing.
Step-by-Step Guide
- Prepare Your Hair: Start with damp, towel-dried hair. Apply a small amount of setting lotion or mousse evenly throughout.
- Section the Hair: Using a comb, divide your hair into small sections. The smaller the section, the tighter the curl will be.
- Create the Curls: Take one section and wrap it around your finger to form a tight curl. Slide the curl off your finger, lay it flat against your scalp, and secure it with a bobby pin. Repeat for all sections of your hair.
- Set the Curls: Allow the curls to set overnight or until completely dry. For faster results, use a hairdryer with a diffuser on a low setting.
- Style the Curls: Once dry, carefully remove the bobby pins. Use your fingers or a wide-tooth comb to gently shape and style the curls. For a polished finish, smooth the curls with a touch of hairspray.
3. The Beehive
Transport yourself to the swinging 1960s with The Beehive, an iconic high-volume updo that screams retro glamour. This timeless hairstyle, known for its dramatic height and bold silhouette, is surprisingly simple to recreate at home. Whether you’re looking to make a statement at an event or want a chic vintage hairstyle for everyday elegance, the beehive is the perfect choice.
Tools You’ll Need
- Teasing Comb: The secret weapon for creating that signature height.
- Hairspray: A must-have to keep the volume intact and the style polished.
- Bobby Pins: For securing sections of the updo.
Step-by-Step Guide
- Prep Your Hair: Start with clean, dry hair. Lightly mist it with hairspray to add some texture and hold.
- Divide Your Hair: Section your hair into two parts—one at the crown for the beehive and the rest for the base. Clip the bottom section out of the way for now.
- Tease the Crown: Using the teasing comb, take small sections of the crown hair and backcomb at the roots. Focus on building volume near the top.
- Shape the Beehive: Smooth the outer layer of the teased hair with the comb to create a rounded, voluminous shape. Gather the section and pin it securely at the back of your head. For extra height, place a hair padding or bun insert underneath the teased section.
- Style the Base: Take the bottom section of hair and either twist it into a low bun, ponytail, or French roll, depending on your preference. Secure it with bobby pins.
- Set the Style: Spray a generous amount of hairspray over the entire hairstyle to hold it in place and keep it looking neat.
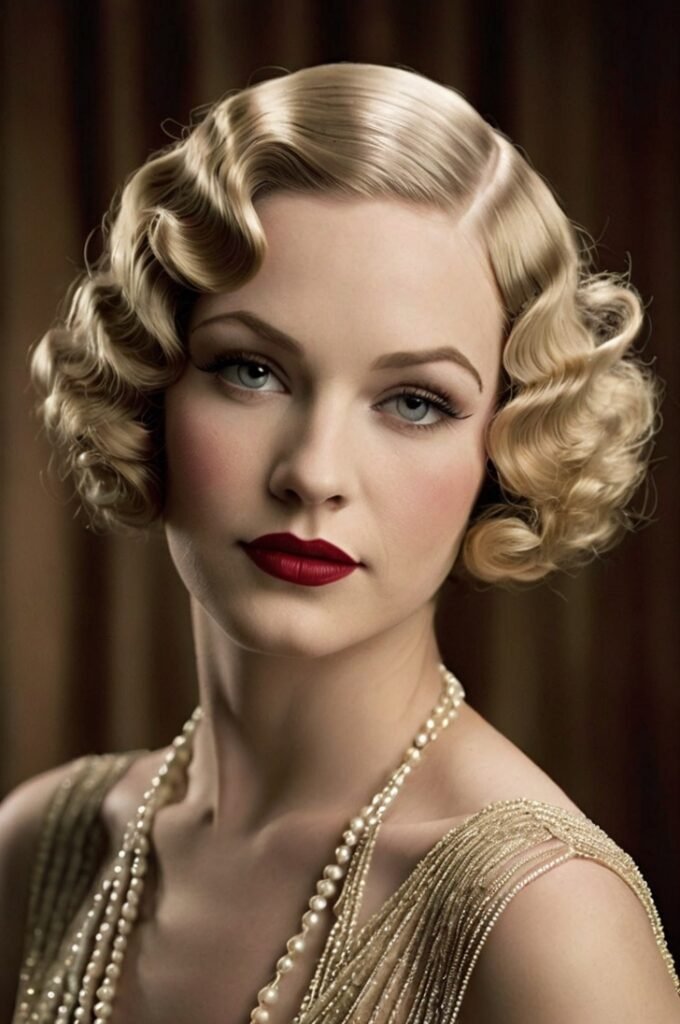
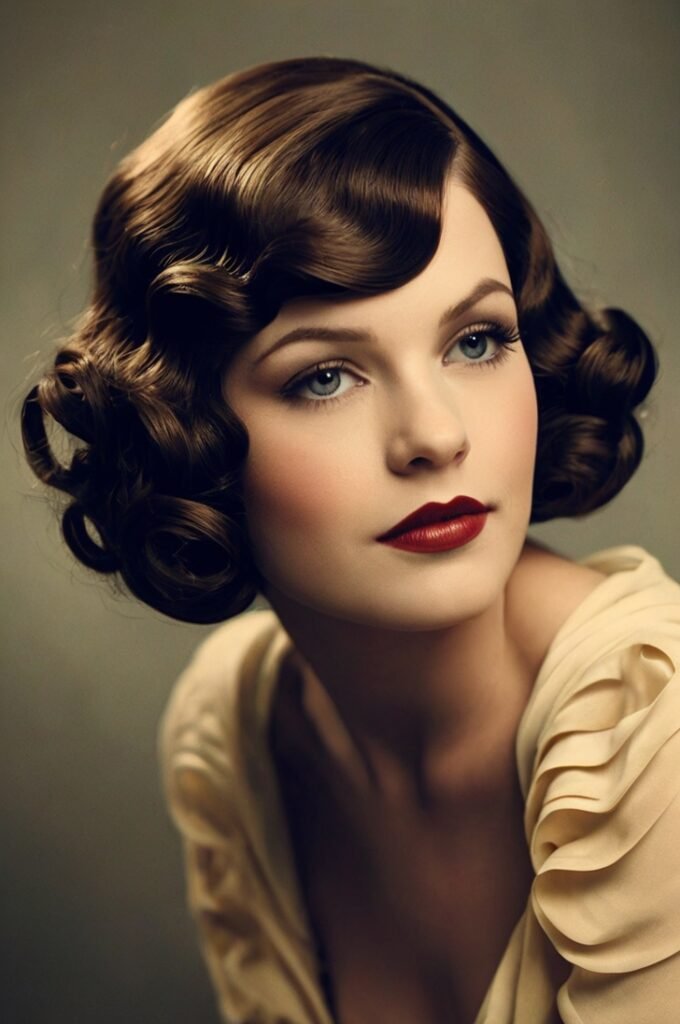
4. The Finger Waves
Sleek, sophisticated, and undeniably vintage, finger waves were a defining hairstyle of the 1920s. Known for their polished “S-shaped” curves, this style embodies the elegance of the flapper era and remains a timeless choice for anyone seeking an effortlessly glamorous look. Whether you’re dressing up for a formal event or channeling a retro vibe at home, finger waves are a stunning option to try.
Tools You’ll Need
- Styling Gel: For a sleek, glossy finish and to hold the waves in place.
- Fine-Tooth Comb: Essential for precision and creating the signature wave pattern.
- Duckbill Clips: To help hold the waves in place while they set.
- Hairspray: For long-lasting hold once the waves are complete.
Step-by-Step Guide
- Start with Damp Hair: Finger waves work best on slightly damp hair. Apply a generous amount of styling gel evenly throughout your hair to ensure it stays in place.
- Part Your Hair: Create a deep side part using the fine-tooth comb for a classic 1920s look.
- Create the Waves: Starting at the front, use the comb to shape an “S” curve in your hair. Hold each curve in place with your fingers and secure it with a duckbill clip. Repeat this process along the length of your hair.
- Set the Style: Allow the waves to air-dry completely. For quicker results, you can use a hairdryer on a low heat setting while keeping the clips in place.
- Remove the Clips: Once dry, carefully remove the clips. Gently smooth the waves with your fingers for a polished finish, but avoid combing them out to preserve their structure.
- Add the Final Touch: Spritz with hairspray to lock the waves in place. For an authentic 1920s flair, consider accessorizing with a jeweled hairpin or headband.
5. The Gibson Tuck
The Gibson Tuck is a simple yet elegant hairstyle that dates back to the Edwardian era. This chic and timeless updo was favored by women seeking an elegant and refined look, with soft, loose waves framing the face. It’s perfect for anyone looking for a vintage-inspired style that’s easy to recreate at home, ideal for both casual and formal occasions.

Tools You’ll Need
- Elastic Band: For securing the base of the bun.
- Bobby Pins: To hold the tucked sections in place.
- Hairbrush or Wide-Tooth Comb: For smoothness and sectioning.
Step-by-Step Guide
- Prep Your Hair: Start with dry, brushed hair. If desired, apply a light styling mousse for extra texture and volume.
- Create a Low Ponytail: Brush your hair back and secure it at the nape of your neck with an elastic band. The ponytail should sit low to the base of your neck, as the Gibson Tuck works best with a low, relaxed look.
- Roll the Hair: Divide the ponytail into two sections. Take the bottom section, roll it upward toward the nape of your neck, and tuck it underneath. Pin it securely with bobby pins.
- Tuck and Pin: For the top section, gently fold the hair back under the rolled section, creating a soft tuck. Secure it with bobby pins to ensure it stays in place.
- Style the Front: For an added vintage touch, you can pull out a few soft strands around your face, allowing them to curl slightly for a delicate, romantic look.
- Set the Style: Lightly spray your finished Gibson Tuck with hairspray to hold it in place.
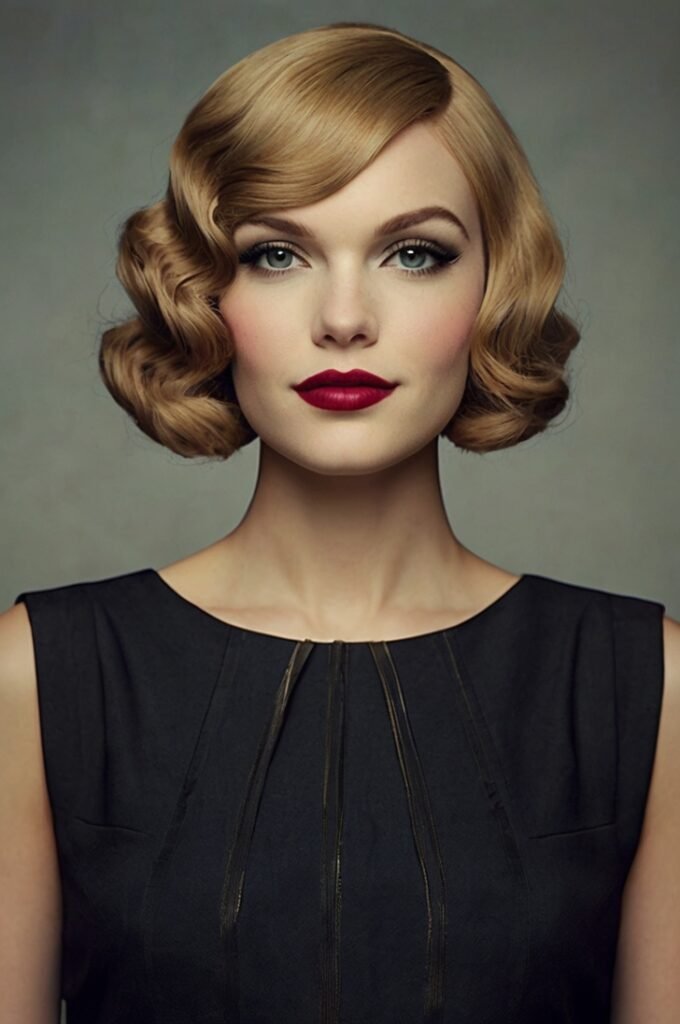
6. The Faux Bob
Inspired by the flapper girls of the 1920s, the Faux Bob is a chic and easy way to get the look of a short bob without committing to a haircut. Perfect for those looking to try a vintage style, it creates the illusion of a bob with soft curls and subtle waves, ideal for vintage-inspired or retro-themed occasions.
Tools You’ll Need
- Bobby Pins: To secure the curls and tuck the hair.
- Curling Iron: For creating soft, voluminous waves.
Step-by-Step Guide
- Curl Your Hair: Use the curling iron to create soft, loose curls throughout your hair.
- Pin the Hair: Roll sections of hair upwards and secure them with bobby pins at the nape of your neck.
- Shape the Faux Bob: Tuck the ends of the rolled hair underneath for a bob-like shape.
- Set the Style: Lightly spray with hairspray to hold the curls and shape in place.
7. The Rolled Updo
The Rolled Updo is a classic 1940s hairstyle that exudes elegance and vintage charm. With its chic, rolled bun design, it offers a sophisticated, timeless look that’s perfect for vintage-themed events or simply adding a touch of retro glamour to your day.

Tools You’ll Need
- Hair Roll or Headband: To create the base for the rolled bun.
- Bobby Pins: For securing the rolls and the updo.
Step-by-Step Guide
- Create a Low Ponytail: Start by gathering your hair into a low ponytail at the nape of your neck.
- Roll the Hair: Take small sections of the ponytail, roll them up towards your scalp, and secure each roll with bobby pins.
- Form the Bun: Continue rolling and pinning until you form a smooth, rolled-up bun.
- Set the Style: Use hairspray to lock the rolls in place and smooth any flyaways.
8. The Hollywood Waves
Hollywood Waves are synonymous with the glamorous golden age of cinema, representing timeless elegance and old Hollywood sophistication. With their soft, flowing curls and smooth, side-swept style, this 1950s-inspired hairstyle remains a go-to look for those seeking red carpet-worthy beauty or a glamorous vintage vibe.

Tools You’ll Need
- Curling Iron: For creating large, soft waves.
- Comb: To smooth the waves and create the perfect side part.
Step-by-Step Guide
- Create a Side Part: Begin by parting your hair deep on one side using a fine-tooth comb.
- Curl Your Hair: Use a curling iron to curl sections of hair away from the face, creating large, smooth waves.
- Brush Through the Curls: Once the curls cool, gently comb through them to soften the waves and create a smooth, flowing look.
- Set the Style: Lightly spritz hairspray to hold the waves in place and add a bit of shine.
9. The Mod Flip
The Mod Flip is a playful, bold hairstyle from the 1960s, often associated with the mod fashion movement. Characterized by outward flipped ends and a voluminous, structured look, this style is perfect for anyone wanting to channel retro vibes with a fun, energetic twist. Whether for a vintage-inspired look or adding a playful edge to your everyday hairstyle, the Mod Flip delivers that chic, 60s flair.

Tools You’ll Need
- Flat Iron or Curling Iron: To create the outward flip at the ends.
- Comb: To smooth and section your hair.
Step-by-Step Guide
- Prep Your Hair: Start with clean, dry hair. Apply a light mousse or styling product to add volume if needed.
- Create Sections: Divide your hair into small sections using a comb to ensure even styling.
- Flip the Ends: Use a flat iron or curling iron to curl the ends of each section outward, creating the iconic flip.
- Set the Style: Gently comb through the hair for smoothness, then lightly spray with hairspray to keep the flip in place.
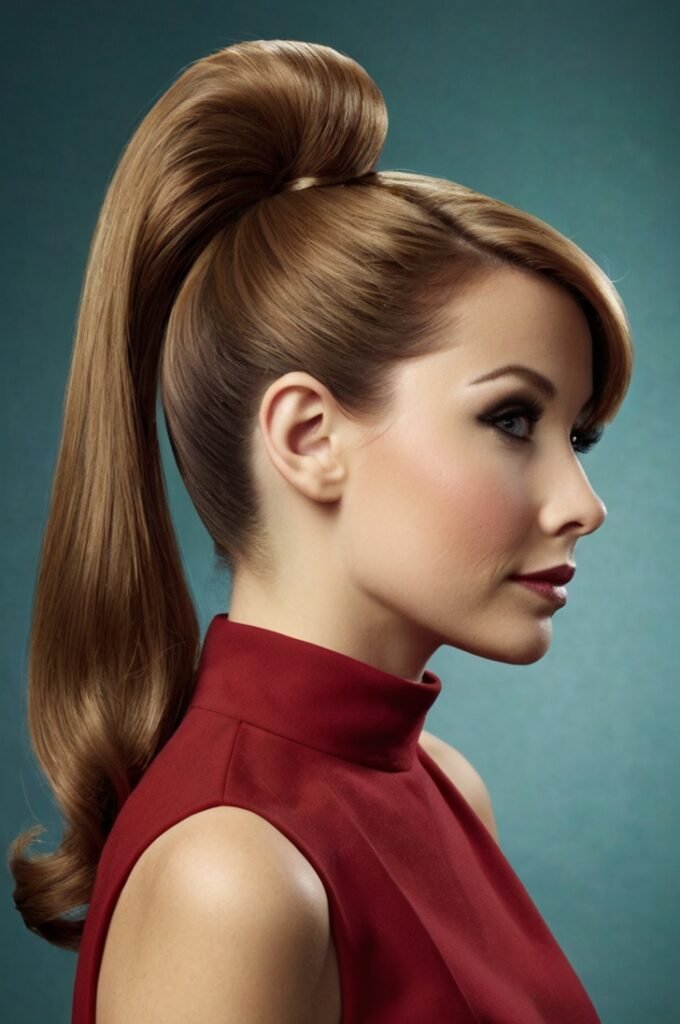
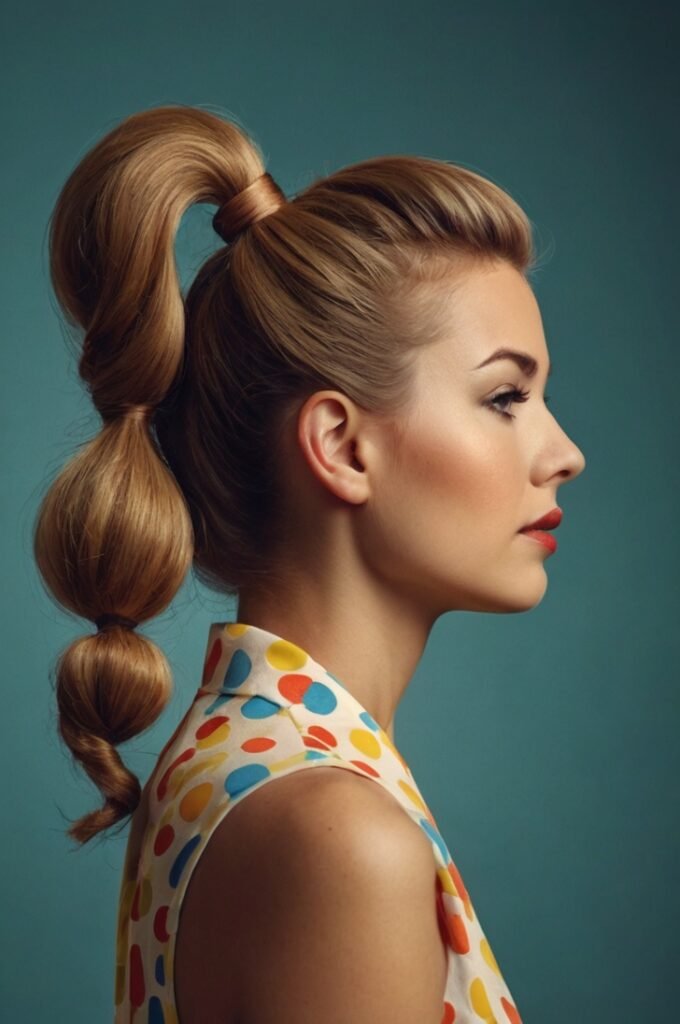
10. The Bouffant Ponytail
The Bouffant Ponytail combines the best of both worlds: a sleek, high ponytail with the dramatic volume and lift of the bouffant style. Popular in the 1960s, this hairstyle creates a striking silhouette, perfect for adding retro flair to your look. Whether you’re looking to channel vintage glamour or simply want a fun, voluminous style, the Bouffant Ponytail delivers both.
Tools You’ll Need
- Teasing Comb: To add volume to the crown.
- Elastic Band: To secure the ponytail in place.
Step-by-Step Guide
- Tease the Crown: Take a section of hair at the crown and tease it gently with a comb to create volume.
- Smooth the Top: Smooth the top section of hair over the teased crown for a polished, voluminous look.
- Gather Hair into a Ponytail: Secure the rest of your hair into a high ponytail using an elastic band, ensuring the voluminous crown stays intact.
- Set the Style: Use hairspray to keep the volume in place and ensure the ponytail stays secure throughout the day.
11. The Scarf Roll
The Scarf Roll is a chic and easy-to-create hairstyle inspired by the 1940s. With its classic, retro charm, this style combines a rolled-up section of hair and a colorful scarf, adding both vintage flair and a touch of practicality. The perfect balance of elegance and ease, the Scarf Roll is ideal for those seeking a simple yet stylish way to elevate their look.

Tools You’ll Need
- Scarf: A colorful or patterned scarf to add a vintage touch.
- Bobby Pins: To secure the rolled section and scarf in place.
Step-by-Step Guide
- Prep Your Hair: Start by brushing through your hair and parting it as desired.
- Roll the Hair: Take a small section of hair at the front and roll it back toward the crown, creating a soft, voluminous roll.
- Secure with Bobby Pins: Pin the roll securely in place with bobby pins, ensuring the style stays intact.
- Add the Scarf: Tie a scarf around your head, positioning it just above the roll and securing the ends with pins. Adjust the scarf so it sits comfortably and adds a pop of color to the style.
12. The Marcel Waves
The Marcel Waves are sleek, structured waves popularized in the 1920s. This iconic hairstyle is known for its smooth, elegant waves that are created using heat. Perfect for vintage-inspired looks or adding a touch of 1920s glamour to modern hairstyles, Marcel Waves exude sophistication and timeless beauty.
Tools You’ll Need
- Marcel Curling Iron: Specifically designed to create smooth, defined waves.
- Comb: To smooth the hair and create precise sections.
Step-by-Step Guide
- Prep Your Hair: Start with clean, dry hair. Apply a light heat protectant to ensure your hair stays healthy.
- Section Your Hair: Divide your hair into small, manageable sections with a comb.
- Create the Waves: Using the Marcel curling iron, clamp a section of hair, twisting it slightly to create the signature wave pattern. Hold each section for a few seconds and then release.
- Smooth and Set: Comb through the waves for a smooth finish, then lightly spray with hairspray to hold the style in place.
13. The Sleek Low Chignon
The Sleek Low Chignon is a timeless and elegant vintage hairstyle, often seen in classic Hollywood films. This simple yet sophisticated look features a low bun that is smooth and polished, perfect for a formal event or a refined, everyday look. The beauty of the low chignon lies in its simplicity, creating a chic and graceful silhouette that never goes out of style.

Tools You’ll Need
- Comb: For smoothing the hair and creating a neat, polished finish.
- Bobby Pins: To secure the bun in place.
- Hair Elastic (Optional): To help gather the hair into a ponytail before twisting into the bun.
Step-by-Step Guide
- Prep Your Hair: Brush your hair thoroughly to remove any tangles. Apply a smoothing product if needed for a sleek finish.
- Create a Low Ponytail: Gather your hair at the nape of your neck and secure it into a low ponytail with an elastic band.
- Twist the Hair: Twist the ponytail into a coil, wrapping it around the base to form a low bun.
- Secure the Chignon: Pin the twisted hair in place with bobby pins, ensuring the bun is neat and secure.
- Smooth the Hair: Use a comb to smooth down any flyaways for a sleek and polished look.
14. The Bubble Ponytail
The Bubble Ponytail is a playful, retro-inspired hairstyle that brings a fun twist to the classic ponytail. With its distinct “bubbles” formed by spaced-out elastic bands, this hairstyle adds volume and personality, perfect for a youthful, retro look. The Bubble Ponytail is versatile, great for casual days or a more playful touch to vintage outfits.
Tools You’ll Need
- Elastic Bands: Small hair elastics to create the “bubbles” in the ponytail.
- Comb: To smooth and section the hair.
Step-by-Step Guide
- Prep Your Hair: Brush your hair to remove any tangles, and apply a light texturizing spray if you want added volume.
- Create a Ponytail: Gather your hair into a high or low ponytail, depending on your preference. Secure it with an elastic band.
- Section the Ponytail: Take small sections of the ponytail and place an elastic band at intervals down the length of the ponytail to create the bubble effect.
- Adjust the Bubbles: Gently tug on each section between the bands to puff up the “bubbles” and add volume.
- Smooth and Finish: Use a comb to smooth any stray hairs, and you’re all set!
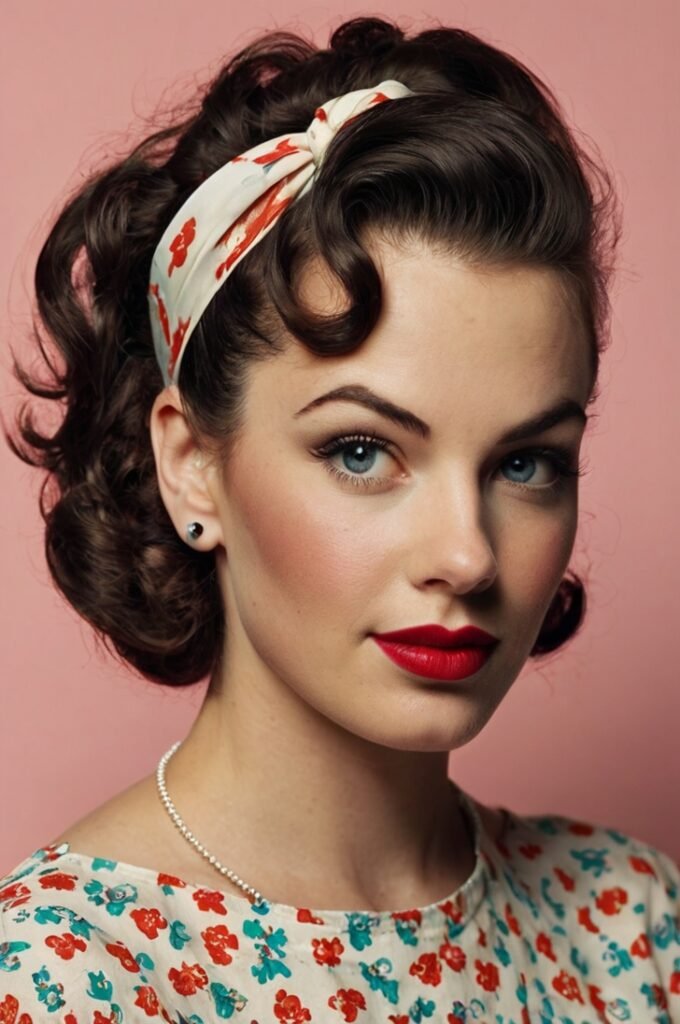
15. The 1950s Bandana Style
The 1950s Bandana Style is a casual, rockabilly-inspired look that incorporates a vibrant bandana as a focal point of the hairstyle. This retro style adds a touch of vintage charm with its combination of soft waves or curls and the classic bandana tied around the head. Perfect for casual outings or adding a playful touch to your vintage wardrobe, the bandana style captures the essence of 1950s Americana.
Tools You’ll Need
- Bandana: A colorful or patterned bandana to tie around your head.
- Bobby Pins: To secure the hair and the bandana in place.
Step-by-Step Guide
- Prep Your Hair: Start by curling or waving your hair for that vintage rockabilly look, or leave it straight for a more casual appearance.
- Position the Bandana: Fold the bandana into a triangle, then place it over the top of your head, with the point facing downward, and the ends on either side of your face.
- Tie the Bandana: Bring the ends of the bandana to the back of your head and tie them in a knot, securing the bandana tightly but comfortably.
- Tuck and Pin: Tuck the ends of the bandana under, and use bobby pins to secure it in place.
- Finish the Style: Smooth any loose hairs and fluff the curls or waves for a polished, retro look.
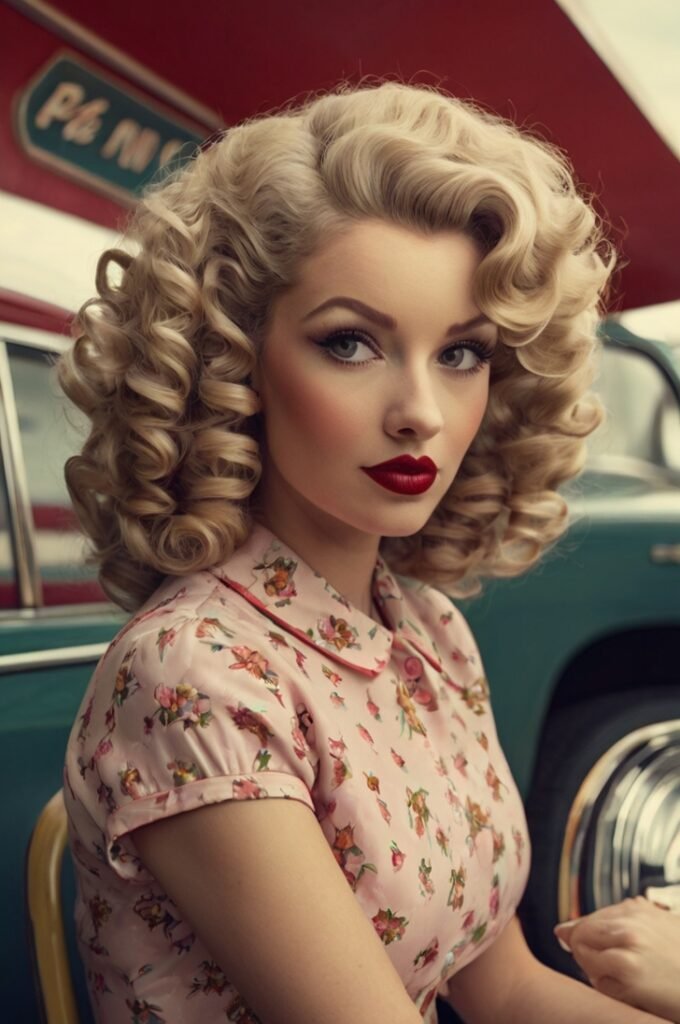
16. The Poodle Curls
The Poodle Curls are tight, bouncy curls that were all the rage in the 1950s. This playful and voluminous style is inspired by the iconic look of the era, known for its full, springy curls that resemble the fluffy poodle dog hairstyle. The Poodle Curls add a touch of vintage glamour, perfect for those looking to make a bold and fun statement with their hair.
Tools You’ll Need
- Curling Iron: To create tight, defined curls.
- Hairspray: To hold the curls in place and add volume.
Step-by-Step Guide
- Prep Your Hair: Start by washing your hair and applying a heat protectant to prevent damage.
- Section Your Hair: Divide your hair into small sections to ensure each curl is defined and even.
- Curl the Hair: Take a small section of hair and wrap it around the barrel of the curling iron, holding for a few seconds before releasing. Repeat this process for all sections of your hair.
- Fluff the Curls: After curling, gently comb through the curls with your fingers to add volume and create a fluffy look.
- Set the Style: Use hairspray to lock the curls in place and give the style extra hold and shine.
17. The Flapper Headband Look
The Flapper Headband Look is a glamorous style from the 1920s that’s defined by a decorative headband paired with sleek, straight hair or soft waves. This look exudes sophistication and vintage charm, making it perfect for a retro-inspired evening or formal event. The headband itself often features embellishments such as feathers, beads, or sequins, adding an extra touch of glamour.
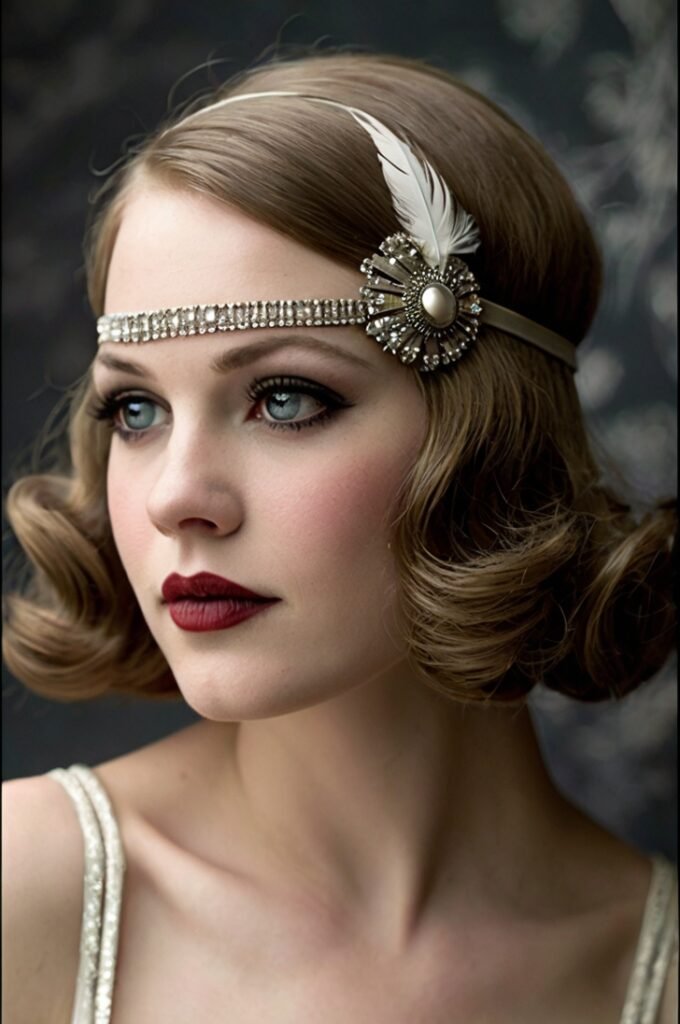
Tools You’ll Need
- Headband: A decorative flapper-style headband, often with embellishments like feathers, beads, or rhinestones.
- Styling Gel: To smooth the hair and create a sleek finish.
Step-by-Step Guide
- Prep Your Hair: Start by washing and drying your hair, then apply a small amount of styling gel to smooth any flyaways and create a sleek texture.
- Style Your Hair: You can either keep your hair straight and sleek or add subtle waves using a flat iron or curling iron. The key is to keep the hair smooth and controlled.
- Position the Headband: Place the decorative headband on your head, positioning it just above your forehead or at the crown of your head.
- Secure the Headband: Adjust the headband so it sits comfortably and is centered. You can pin it in place with bobby pins for added security if needed.
- Finishing Touches: Use a bit more styling gel to smooth down any stray hairs, ensuring a polished, vintage look.
18. The Pageboy Haircut
The Pageboy Haircut is a classic style from the 1950s, featuring smooth, sleek hair with curled-under ends. This hairstyle is known for its bob-like appearance, where the ends of the hair are curled under, giving it a smooth, refined look. It’s a versatile style that works for both casual and formal occasions, exuding vintage charm with a chic, timeless vibe.

Tools You’ll Need
- Curling Iron: For curling the ends of the hair under.
- Comb: To smooth and style the hair to perfection.
Step-by-Step Guide
- Prep Your Hair: Start by washing your hair and applying a heat protectant to prevent damage.
- Section Your Hair: Divide your hair into manageable sections to ensure even styling.
- Curl the Ends: Using a curling iron, curl the ends of each section under to create the signature pageboy shape. Hold each curl for a few seconds to ensure the style lasts.
- Smooth and Set: Use a comb to smooth the rest of your hair and blend the curls for a polished look.
- Finishing Touches: Lightly spray hairspray to keep the curls in place and add shine for a smooth, elegant finish.
Styling Tips and Tricks
- Maintain Your Vintage Hairstyle: Use setting spray or a light hairspray to keep your style in place throughout the day. For curls, opt for a curl-enhancing spray to maintain bounce and texture.
- Pairing with Outfits and Makeup: Complement your vintage hairstyles with period-inspired outfits, such as flapper dresses for the 1920s looks or classic pencil skirts for 1950s styles. For makeup, go for bold red lips, winged eyeliner, or soft smoky eyes for a true vintage vibe.
- Adapting for Modern Occasions: Modernize your vintage hairstyles by pairing them with contemporary clothing, like denim jackets or modern dresses. Keep the hair sleek and natural for a more relaxed, everyday look while maintaining the vintage essence.
FAQs – Vintage Hairstyles
Do I need professional skills to create these hairstyles?
No, these vintage hairstyles can be easily recreated at home with basic tools and a little practice.
Can I do these on short/medium/long hair?
Yes, many of these styles can be adapted for different hair lengths, with adjustments to the curling or styling technique.
What’s the best way to preserve these hairstyles overnight?
Wrap your hair in a silk scarf or use a loose braid to protect the style and reduce frizz overnight.
Conclusion
Recreating vintage hairstyles at home is simpler than it seems, with just a few basic tools and some creativity. These timeless styles offer endless opportunities to express your unique personality and style. So, don’t be afraid to experiment with these looks and make them your own.